Installing and Setting Up SSHChain
After downloading the SSHChain disk image, double-click to open it, and then drag the SSHChain application to your hard disk (e.g. to /Applications/Utilities).
Setting up SSHChain to manage your ssh-agent involves
the following steps:
- Add your SSH identities to your Keychain.
- Configure SSHChain.
- Set up your environment.
- Log out and back in again.
These steps are described below. These same instructions can also be found in the SSHChain Help: double-click the SSHChain icon in the Finder to open the Preferences dialog, and then click the help (?) button to open SSHChain Help.
Add SSH Identities to Keychain
SSHChain reads your SSH identities out of your default Keychain. To add them, use the Keychain Access application (in /Applications/Utilities).
In Keychain Access, select your default keychain, and add each SSH identity as follows:
- Create a new password with File : New Password Item.
- For the Name, enter
ssh-agent. This is how SSHChain recognizes the password as an SSH identity. (There is no problem having multiple passwords with the same name.) - For the Account, enter the complete path to the SSH identity file. This is typically something like /Users/me/.ssh/id_dsa.
- Enter the identity's passphrase in the Password field.
- Click Add.
Configure SSHChain
If the SSHChain Preferences dialog is not already visible, double-click the SSHChain icon in the Finder to open it. (If you're using Mac OS X 10.5 [Leopard], and SSHChain doesn't seem to open properly, see here.)
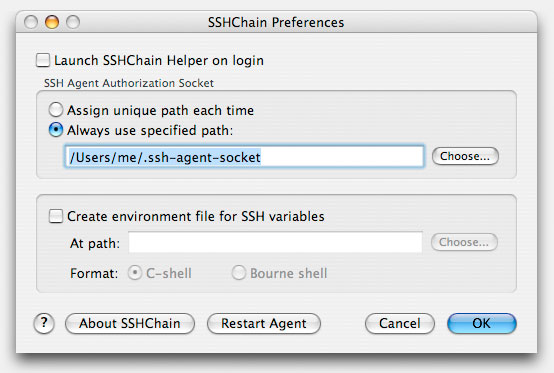
To have SSHChain launch, and start ssh-agent, each
time you log in, select the Launch SSHChain Helper
on login checkbox.
By default, SSHChain will create the ssh-agent socket
as a hidden file in your home directory, but you can choose any location
and name you wish. Whichever path you specify here will be set in your
environment, as described below.
Click the OK button to save your preferences and dismiss the dialog.
Set Your Environment
To make the ssh-agent available to all applications,
both those started from the Terminal and those started from the Finder,
the SSH_AUTH_SOCK environment variable must be set by
Login Window when you log in. This can't be done via the usual shell
mechanisms (e.g. .login, .profile, .cshrc and the
like), but requires a special file called environment.plist.
The environment.plist file defines environment variables that Mac OS X should set when you log in. These variables are visible to all applications, including those launched from the Finder. The environment.plist file must be placed in a special directory inside your home directory, called .MacOSX (note the leading dot). There are different ways to create this file (including the Property List Editor application that comes with the Developer Tools), but it is also easily created with a text editor.
Assuming that you defined the socket path (in the SSHChain Preferences dialog), as /Users/me/.ssh-agent-socket, your environment.plist would look as follows:
<?xml version="1.0" encoding="UTF-8"?>
<!DOCTYPE plist SYSTEM
   "file://localhost/System/Library/DTDs/PropertyList.dtd">
<plist version="0.9">
<dict>
	<key>SSH_AUTH_SOCK</key>
	<string>/Users/me/.ssh-agent-socket</string>
</dict>
</plist>
The complete path to this file will be ~/.MacOSX/environment.plist.
For more information on the environment.plist file, see this ADC Article.
Log Out and Log In Again
Because the environment.plist is only applied when you log in, you must log out and back in again to have the changes take effect. This will also cause SSHChain to restart, and read the SSH identities that you have added to your Keychain.
After logging back in, test that everything is set up correctly by opening a Terminal window and issuing the command:
ssh-add -l
If all is well, ssh-add will list each of the identities
that you've added to your Keychain. If not, see the
FAQ.